- Typical tide mark height
- 1-1.5 metres above floor level
- Cases matching this tide-mark range
- 92% (BRE Digest 245, 200+ buildings)
- Cases misdiagnosed as rising damp
- 70% were condensation instead
- High moisture reading threshold
- above 20% on a wood-equivalent scale
- Normal moisture reading threshold
- under 15% on a wood-equivalent scale
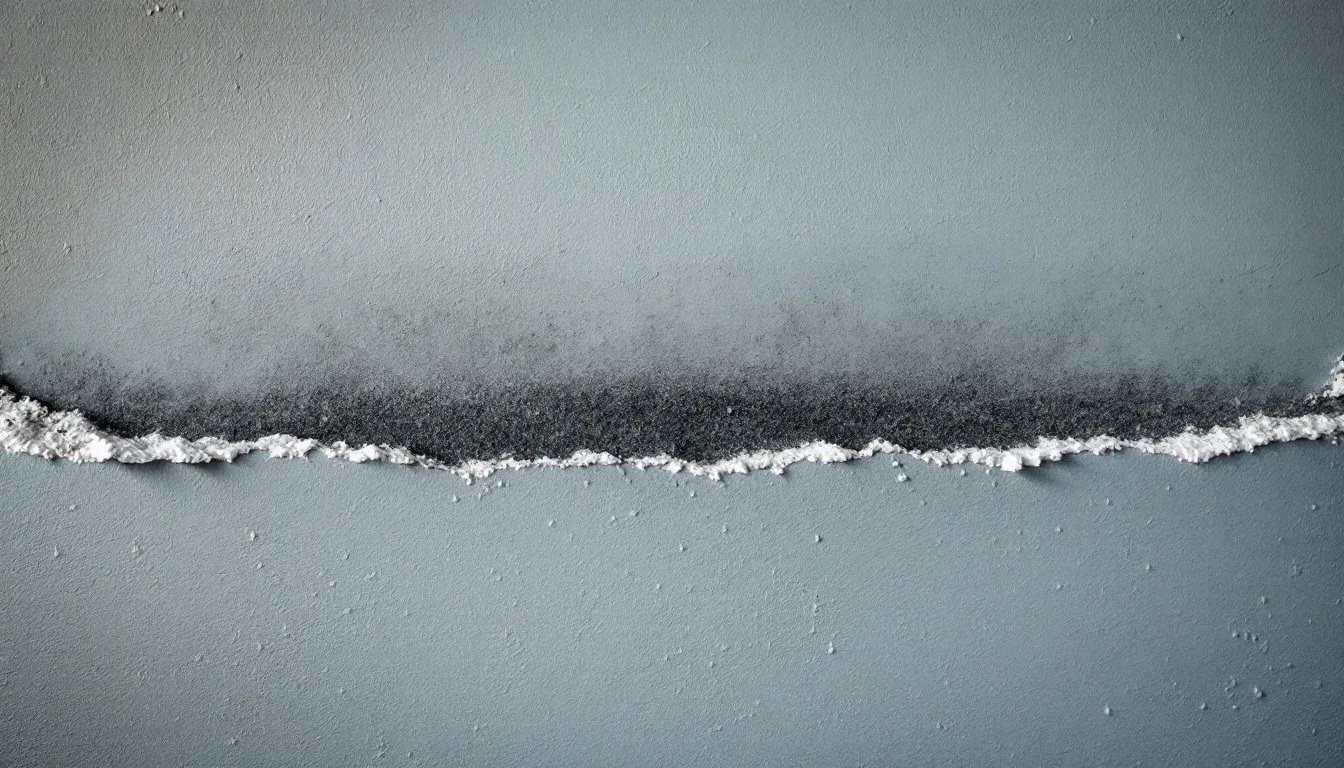
The distinctive tide mark
The most recognisable sign of rising damp is a horizontal line of staining roughly 1-1.5 metres above floor level. This tide mark forms because groundwater climbs through the wall by capillary action until the rate of evaporation equals the rate of water rising from below.
Below the tide mark, the wall is darker and may feel damp or cold to touch. Above the line, the wall is dry. This sharp horizontal boundary is the signature of rising damp and distinguishes it from other forms of dampness, which rarely produce such a clear demarcation.
The height of the tide mark varies slightly depending on wall porosity, ventilation, and ground moisture levels, but it consistently falls within the 0.9-1.5m range. Damp patches above 1.5m are almost never rising damp. They are more likely to be caused by leaks from gutters, roofs, or plumbing.
BRE Digest 245 (2007) analysed over 200 buildings with rising damp and found that 92% showed tide marks between 0.9m and 1.5m.1 Anything higher suggests a different moisture source.
Salt deposits: efflorescence and hygroscopic salts
Rising damp carries dissolved salts (nitrates, chlorides, sulfates) from the ground. As water evaporates from the wall surface, these salts crystallise and become visible. There are two types:
Efflorescence (white fluffy crystals)
Efflorescence appears as white powder or fluffy crystals on the wall surface. It is non-hygroscopic, meaning it does not absorb moisture from the air. If you brush efflorescence off, the wall underneath is dry.
Efflorescence is common in new brickwork and can occur with or without rising damp. Its presence alone does not confirm rising damp, but when combined with a tide mark and damp plaster, it supports the diagnosis.
Hygroscopic salts (brown or grey damp patches)
Hygroscopic salts absorb moisture from the air, keeping the wall surface damp even when no water is rising through the masonry. These salts appear as brown, grey, or yellow patches that feel damp or sticky to touch.
Hygroscopic salts are the reason rising damp often returns after decoration. Even if a new damp proof course stops capillary rise, the salts embedded in the old plaster continue to draw moisture from the air. This is why affected plaster must be hacked off and replaced with salt-retardant renovating plaster after DPC installation.
BRE Good Repair Guide 6 (2005) identifies hygroscopic salts as the primary cause of persistent damp staining after DPC treatment.2 Replastering is not optional if you want a permanent fix.
Flaking and bubbling plaster
As salts crystallise behind the plaster surface, they expand and push the plaster away from the wall. This causes bubbling, flaking, or entire sheets of plaster lifting off.
The damage typically starts at the base of the wall and works upward to the tide mark. If you tap the plaster with your knuckles, it sounds hollow where it has detached from the masonry.
Gypsum plaster is particularly vulnerable because it is soft and porous. Cement render is harder but still fails over time as salts accumulate. Only salt-retardant renovating plasters are designed to resist this type of damage.
Peeling paint and wallpaper
Paint and wallpaper cannot adhere to damp walls. Rising damp causes decorations to peel, bubble, or turn brown from the bottom up. Vinyl wallpaper may trap moisture behind it, accelerating mould growth and plaster decay.
If you redecorate without addressing the underlying rising damp, the new finish will fail within months. Many homeowners go through multiple rounds of painting or papering before realising the problem is structural, not cosmetic.
Musty smell and mould growth
Damp walls support mould and mildew growth, creating a musty, earthy smell. The smell is strongest in poorly ventilated ground floor rooms with external walls.
Black mould (Stachybotrys) can develop on wallpaper or skirting boards in contact with damp masonry. While mould itself is not unique to rising damp (it also grows in condensation-prone rooms), persistent mould at low level near external walls suggests moisture is coming from below rather than from indoor humidity.
Rotting skirting boards and timber decay
Timber in contact with damp masonry absorbs moisture and decays. Skirting boards, joists, and floorboards near affected walls become soft, discoloured, and crumbly.
If you can push a screwdriver into the base of a skirting board with little resistance, the timber is rotten. This is a strong indicator of long-term dampness at floor level.
In severe cases, rising damp can lead to wet rot or even dry rot in suspended timber floors. Dry rot requires immediate attention because it spreads rapidly through timber and masonry, causing structural damage far beyond the original damp zone.
How to test for rising damp with a moisture meter
A moisture meter measures the electrical resistance or capacitance of a material, which changes with water content. It provides numerical readings that help distinguish rising damp from condensation or leaks.
Where to measure
Take readings at multiple heights on the affected wall:
- Floor level (100mm above skirting)
- 500mm above floor
- 1 metre above floor
- 1.5 metres above floor
- 2 metres above floor (if accessible)
Remove any wallpaper, paint, or loose plaster before testing. Moisture meters work best on bare plaster or brick. Press the meter's pins or sensor plate firmly against the wall and wait for the reading to stabilise.
What the readings mean
Rising damp produces a characteristic moisture profile:
- High readings at floor level (above 20% on a wood-equivalent scale or "damp" zone on a traffic light meter).
- Declining readings with height, typically dropping to normal (under 15%) above 1.5m.
- Consistent horizontal pattern across the width of the affected wall.
If readings are high at all levels, the problem is likely condensation or a leak from above. If readings are localised to one area, check for penetrating damp from a gutter, downpipe, or plumbing leak.
Note that moisture meters cannot distinguish between water from rising damp and water absorbed by hygroscopic salts. A wall may show high readings even after a DPC has been installed if salt-contaminated plaster remains in place.
Distinguishing rising damp from other types of damp
Condensation
Condensation forms when warm, humid air hits cold surfaces. It appears as widespread surface moisture on walls, windows, and ceilings, with no consistent tide mark. Mould grows in corners, behind furniture, and around window frames.
Condensation is worst in winter, especially in poorly ventilated bathrooms and kitchens. Moisture meter readings are relatively uniform across the wall, without the declining gradient of rising damp.
A 2014 study by the Centre for Window and Cladding Technology found that 70% of homeowner-diagnosed rising damp cases were actually condensation.3 Improving ventilation and heating often solves the problem without DPC work.
Penetrating damp
Penetrating damp is water entering through the wall face, usually from blocked gutters, leaking roofs, or failed pointing. It appears as isolated damp patches near the source of the leak, often near windows, chimneys, or gutter brackets.
Penetrating damp is worst during or after heavy rain. It can occur at any height and does not produce a horizontal tide mark. Moisture meter readings are high around the leak but drop quickly as you move away.
Hygroscopic salts from old rising damp
If a building had rising damp in the past, hygroscopic salts may remain in the plaster even after the rising damp has been cured. These salts absorb moisture from the air, causing damp patches that mimic active rising damp.
The difference is that hygroscopic damp fluctuates with indoor humidity. It is worse in summer when humidity is high and better in winter when indoor air is drier (due to heating). Active rising damp is constant or worse in winter when groundwater levels are high.
If moisture meter readings are high but the wall dries out when the room is heated and ventilated, suspect hygroscopic salts rather than active rising damp.
When to get a professional survey
If you are unsure about the cause of dampness, or if you are buying a property and the surveyor has flagged potential rising damp, get a specialist damp survey. Look for surveyors who are members of the Property Care Association (PCA) or the Royal Institution of Chartered Surveyors (RICS).
A proper survey should include:
- Moisture meter readings at multiple heights and locations
- Visual inspection of external walls, ground levels, and drainage
- Inspection of any existing DPC and identification of bridging
- Salt analysis (if hygroscopic salts are suspected)
- Written report with diagnosis and recommended treatment
Be wary of free surveys offered by damp proofing contractors. Some have a financial incentive to diagnose rising damp even when it is not present. An independent survey from a qualified surveyor (not affiliated with a treatment company) is more reliable.
Sources
- BRE Digest 245 (2007): Rising damp in walls - diagnosis and treatment
- BRE Good Repair Guide 6 (2005): Treating rising damp in houses
- Centre for Window and Cladding Technology, University of Bath: Damp diagnosis study (2014)
- Property Care Association: Code of Practice for diagnosis of rising damp (2023) (accessed 3 July 2026)
- Building Regulations Approved Document C (2022): Resistance to moisture